Wednesday, January 30, 2013

Chocolate Peanut Butter Ganache-Dipped Almonds


Once of my New Year's resolutions this year was to do two Whole30's. February happens to be the first of those months. Since you can't have any sugar, I've been trying to wean myself off before it starts to prevent a horrible first week of cravings and sugar crashes. So I made chocolate peanut butter ganache-dipped almonds! Can't think of any problems with that...

Ever since becoming pregnant with my daughter, I haven't craved nuts by the handful like I used to and the craving has never really returned since she was born. Now, I prefer to have them with either a few dried cranberries or a little chocolate. They seem to go down a little easier...

These little nuts are already almost gone. My hubby's standard question when he opens the fridge has become, "Can I eat these?" I either say, "Yup. I already took my pictures." or "Paws off. I didn't shoot them yet." I don't think anybody warned him that when I started this blog, some food in his own home would become off-limits. Poor guy.

Sometimes food hardly makes it off my backdrop before somebody (*cough, cough) digs in. And I can guarantee that if you like chocolate, peanut butter, and almonds, you'll be eating these straight out of the freezer. And we can be friends!


Chocolate Peanut Butter Ganache-Dipped Almonds
Adapted from this recipe 

5 ounces bittersweet chocolate, finely chopped
1/4 cup heavy cream
2 tablespoons peanut butter, not chunky or natural
Pinch of sea salt (small)
1 1/2 cups whole raw almonds

Line a large baking sheet with parchment paper.

In a small pot over low heat and stirring constantly, heat chocolate, cream, and peanut butter until melted and glossy. It may appear slightly grainy due to the peanut butter. Stir in a small pinch of sea salt and remove from heat.

Pinching an almond by one end with your fingers, dip the other end into the chocolate and swirl it around to thicken the chocolate coat. Place in a single layer on lined baking sheet.

Place pan in freezer for about 10 minutes until chocolate hardens.

Store in an airtight container in the refrigerator. The chocolate softens quite a bit if left at room temperature.


Pinit

I'm linking up this recipe at Design, Dining & Diapers, Lemons for Lulu, The Humble Brag, Taste and Tell Blog, Back for Seconds, & Buns In My Oven

Back For Seconds Second to None


Monday, January 28, 2013

Buffalo Turkey Roll Ups


I can't say I've ever seen "buffalo turkey" recipes before, but just trust me on this one. Depending on how you prepare it, chicken breasts can dry out really easily. I've discovered that turkey is a little more resilient on that end.


The rub adds a lot of kick without a lot of chemicals. The kick comes in slow after you're done eating these. I'm a middle-of-the-road person when it comes to spicy foods. There's nothing worse to me than tearing up and not being able to taste the actual food. But I'm not afraid to sweat a little! Having some blue cheese dressing and celery on the side really helps cut intolerable heat. Plus, it's a classic combination for a very good reason.


For all of those football fans (and football food fans -me!) this is a great recipe to throw together for the upcoming Superbowl or even any weeknight when you're scrambling to get dinner on the table. It looks impressive, but is ridiculously easy. There's no doubt I'll be making this again.


Buffalo Turkey Roll Ups
Serves 4


2 1/2-3 pound turkey half breast or 4 chicken breasts, skin and bones removed if necessary
2 teaspoons chipotle powder (use half to decrease the heat)
1 teaspoon chili powder
1/4 teaspoon cayenne pepper, optional
1/2 teaspoon garlic powder
1/2 teaspoon onion powder
1/4 teaspoon black pepper
1/2 teaspoon sea salt
1 cup crumbled blue cheese
Frank's Red Hot sauce, optional
Celery sticks, for serving
Blue Cheese Dressing, for serving

Preheat oven to 400 degrees F.

Using a meat mallet, pound the turkey breast to 1/2-inch thickness and cut into about 3 equal pieces. Mine were about as big as my outstretched hand.

In a small bowl, combine the chipotle powder, chili powder, cayenne pepper, garlic powder, onion powder, pepper, and salt.

Rub the seasoning into both sides of the turkey and place the smoothest side down in an 8 x 8-inch pan.

Sprinkle the turkey pieces with the blue cheese and use your palm to press it into the meat.

If desired, drizzle a little hot sauce over the cheese. Roll up and place the open edge down in the pan so they don't unroll as they cook.

Bake for 30-40 minutes, until turkey is cooked through and no pink remains. Don't be afraid to take some of those pan juices and pour them over the turkey with a spoon before you cut into them!

Cut with a serrated knife into 1/2-inch thick slices.

Serve with celery sticks and blue cheese dressing to cut the heat.


Pinit

I'm linking up this recipe at Taste and Tell Blog, DJ's Sugar Shack, Lady Behind the Curtain, Design, Dining & Diapers, and Lemons for Lulu.

Friday, January 25, 2013

Roasted Garlic Hummus + Tutorial to Make the Smoothest Hummus


I've seen Deb from Smitten Kitchen and a few others do a recipe using this method of shelling the thin, papery skins from chickpeas to make hummus even smoother. If you think I'm a little crazy to spend valuable time removing those little skins, that's all right. I didn't time the whole process because I spent some time figuring out which method was the fastest (see below), but I was able to rock and roll through two cans of chickpeas like it was nothing.

Rather than try to describe how to do this, I'll show you in pictures. First, either cook your dried beans or open your cans (I used canned because I couldn't find them dry). Rinse, then drain them and leave them in the colander set over a plate. Have another larger bowl to put the shelled beans in and a smaller one for the skins.

You can see these still have the skin on them which has started to split open. Most of them will be slightly split, which makes the skin easier to remove. Plus, they have a sandy-looking texture. Removing that will reveal the shiny bean underneath!


Pinch one between your fingers like so:


Applying slightly more pressure towards the ends of your fingers, imagine that you are trying to hold on to the outer layer, while pushing the bean down towards your palm. It's easier to understand while you're doing it. Trust me!


Then, the bean will fall into your palm and you can put it in your empty bowl.


See how shiny and reflective they are without their skins?


Now, they're ready for your super-smooth hummus!

And yes, I noticed a difference in texture, so I think the little extra time was worth it. Plus, it's a good time to do some deep breathing :)


Roasted Garlic Hummus
Makes 3 cups

1 head of garlic
2 tablespoons olive oil, plus additional for garlic and topping, if desired
2  15 ounce cans / scant 4 cups of cooked chickpeas 
2 tablespoons lemon juice
1 teaspoon sea salt
2 tablespoons water
1/4 teaspoon cayenne pepper, optional
Sprinkle of red pepper flakes, optional

Preheat oven to 400 degrees F.

Cut off the top of the garlic head (papery cone part) enough to expose the flesh of most/all of the garlic cloves. Place on a piece of aluminum foil and drizzle with a small amount of olive oil. Tightly wrap the garlic and place on a small pan in the middle of the oven.

Bake for 40 minutes or until the cloves have lightly browned and are soft enough to squeeze out of their skins.

Unwrap from the foil and allow to cool until you can safely handle them without getting burned. Squeeze out 1-2 teaspoons.

In the bowl of a food processor, place chickpeas, roasted garlic, lemon juice, salt, water, and 2 tablespoons olive oil. Process until smooth.

Adjust seasonings and add cayenne pepper if desired. Process to combine.

Place in a bowl and top with additional olive oil and red pepper flakes if desired.

Serve with vegetables, crackers, pitas, or chips.
  

Pinit

Another recipe I loved this week: When you have burgers for dinner at least once a week it's fun to switch things up a little. Don't get me wrong, I'll never turn down a beef burger, but this Fajita Turkey Burger from Carrian at Sweet Basil was incredible. My problem with turkey burgers in general is their dryness. Not this one! I served this without buns or cilantro and we absolutely demolished them. I was able to get 5 large burgers out of my pound of turkey rather than 3-4.

I'm linking up this recipe at The Humble Brag.

Monday, January 21, 2013

Raspberry Mousse


Valentine's Day is one of those days that sneaks up on me. This year, I appear to have my act together since this is the second Valentine's-Day-appropriate dessert I've posted this month. Now, I'm torn between my Molten Lava Cakes and this mousse! They're both sweetened with honey, flour- and gluten-free, and pretty darn easy to make. I guess the deciding factor is whether your 'honey' (ha ha) likes chocolate or fruit.


I was nervous about the crust as it was baking because it tasted so bland, but when you stir the honey in at the end, everything changes.

This mousse is bright and fun and makes me crave summer berries. Making this in the dead of winter pretty much necessitates frozen raspberries. Unless you like paying $5 for dry and marginal berries. No thank you.


Next time, I'd like to try blackberry and lime together. Still working from the same basic recipe, but using blackberries instead of the raspberries and lime juice and zest in place of the lemon. That would change the whole look of this mousse and would probably be equally amazing.

I must be subconsciously craving spring because all my shots lately look so light and airy! I wasn't doing that on purpose. I swear.

Plus, the temps just plummeted here in Wisconsin and I'm not really happy about it. As strange as it was to have melting snow and water running down the streets, it secretely made me smile. Since it's zero today, I'm staying in! It's hard for me to appreciate weather that forces me inside.

Guess I'll just stay in with my chocolates, trail mix, and cookbooks. Can't really complain about that...


Raspberry Mousse
Adapted from this recipe
Makes 4 large servings

2 ounces / scant 1/2 cup raw hazelnuts
2 ounces / scant 1/2 cup raw almonds
2 ounces / 1/2 stick unsalted butter, melted
4 tablespoons honey, plus 1 teaspoon
16 ounces cream cheese, softened to room temp
9 ounces / 2 1/2 cups raspberries, fresh or frozen and thawed
2 teaspoons vanilla extract
1/2 teaspoon lemon juice
1 cup heavy whipping cream

Preheat oven to 350 degrees F.

Line baking sheet with parchment paper.

In a food processor or powerful blender, grind the hazelnuts and almonds until it creates a fine meal (not so far that you start making nut butter). Add melted butter and pulse together until combined.

Spread on the lined baking sheet. If the nuts make small clusters, it's fine. Bake for about 30 minutes, stirring every 5 minutes. Remove when nuts have darkened slightly in color and give off a nutty aroma. Be very careful not to burn. While still warm, drizzle 1 tablespoon honey over and stir to combine. Allow to cool on pan.

Place the softened cream cheese in a large mixing bowl and using the paddle attachment, beat on medium speed until smooth and creamy, about 3 minutes.

If you don't want seeds in your mousse, press the raspberries through a fine-meshed sieve. I skipped this step and left my seeds in. Beat the raspberries into the cream cheese until fully combined. Add 1 teaspoon of vanilla, lemon juice, and 3 tablespoons of honey. Stir to combine. Transfer to another bowl if using a stand mixer and refrigerate.

Using stand mixer bowl or other large bowl, whip heavy whipping cream on medium speed until soft peaks form. Add 1 teaspoon vanilla extract and 1 teaspoon honey. Increase mixer speed to medium-high, whipping for another minute or two and cream becomes more firm. If it's firm enough to hold it's shape when scooped with a spoon, that's a good time to stop.

Remove 1/2 cup of the whipping cream from the bowl and gently stir into the raspberry mousse until no white streaks remain.

Scoop 3-4 tablespoons of nuts into four 6-ounce glasses and pack firmly with your fingers. Spoon or pipe the raspberry layer over the crust, dividing evenly between the four glasses. Top with a generous portion of the whipped cream.

Serve immediately or after chilling for a few hours. If storing, place in a covered container to prevent the surface of the mousse and whipping cream from drying out.


Pinit

Sweet 2 Eat Baking

Friday, January 18, 2013

Texas Caviar


Sometimes a big plate of vegetables can be a little overwhelming. Even for me. There's a lot of chewing involved when trying to gnaw your way through a whole pile of veggies. But when you do something like this,  you can breeze through a massive bowl in no time!

The first time I made Texas caviar, I was in college and had just bought Joy of Cooking. I was home in Michigan on break at my sister's new house and I had brought my new cookbook! (Nerd alert) We ended up stirring it up in an old ice cream pail and inhaling almost the whole batch in the same afternoon. Isn't there something so exciting about trying a new food for the first time? Kind of like the first time I tried raw fish (thought it was going to be better, or at least I'd feel more sophisticated) or tiramisu. Now that, I still dream about. Sometimes the first time you have a food is the most memorable. Isn't it funny how that works?

Back to the caviar... Another side-bar: Still haven't had actual caviar yet. Ok. Now back to this caviar. If you have a smaller family or just don't want to eat that many chips, I piled some on my eggs this morning and it added a lot of fresh flavor and vegetables to my normally-plain-Jane-eggs.

As I get more into blogging, I'm realizing how many great blogs are out there. Take a look at my Pinterest boards if you don't believe me! I see so many great recipes that I want to try, but don't necessarily want to take the time required to rework it to "make it my own", or write up a special post, or take the pictures. Sometimes, I just want to make something and share it with you! So every week I'll be sharing a recipe from another blogger that I've made and loved. If you want to try it out for yourself, I'll have a link so you can see the recipe. It will be a short blurb on the bottom of one of my posts, so keep your eyes open for that!


Texas Caviar
Makes about 6 cups
Adapted from Joy of Cooking

3 1/2 cups black eyed peas (canned or cooked)
2 jalapenos, diced with ribs and seeds removed
1 medium tomato, chopped
1 red bell pepper, chopped
3 cloves garlic, finely chopped
1/2 medium white onion, chopped
Small handful cilantro, chopped
2  15-ounce cans corn, drained & rinsed (or 2 cups fresh, if available)
1 tablespoon Worcestershire sauce
1/2 teaspoon sea salt, plus additional to taste
1/4 cup lemon juice
1/2 cup olive oil
Tortilla chips, for serving
In a large bowl, stir together the peas, jalapenos, tomato, bell pepper, garlic, onion, cilantro, corn, and Worcestershire sauce.

In a small bowl, whisk together the 1/2 teaspoon sea salt and lemon juice. While constantly whisking, slowly drizzle in the olive oil. Add to the large bowl. Give another toss. Add additional salt if needed.

Can be served immediately, but this is best if you let it sit at least a few hours or overnight in the refrigerator.

Serve with tortilla chips.


Pinit

Another recipe I loved this week: I finally got around to doing chili for the first time this winter, and I picked a great recipe to kick it off! I knew I'd love this recipe for 3 reasons: it only called for 1 pound of beef, it's a crock pot recipe, and it's topped with an avocado salsa. Check out the Taste and Tell blog for the Easy Slow Cooker Chili with Avocado Salsa recipe.

Monday, January 14, 2013

Chewy Toffee Chocolate Blondies


Believe it or not, this is the first blondie I've ever had. I know! I can't figure out what I've been waiting for... It's like a cross between a chocolate chip cookie (a real thick one) and a brownie. Plus, not having to spoon out individual balls of dough and bake multiple pans of cookies is a huge bonus. 


Smear it once into a pan. Bake. Have a coffee. Catch up on some dishes. Take a nap. Pin some stuff on Pinterest. Remove from oven. And you only dirtied one pan (also 2 bowls and a bunch of measuring cups and spoons, but we're not counting those). Based on my semi-recent inability to keep up with my growing pile of dishes, the one-pan deal is the biggest asset. 


This is one of the thickest batters I've dealt with, so please don't try to stir in your toffee and chocolate with a rubber/plastic spatula. I don't want you to cuss because it broke. Just pull out the handy wooden spoon or large metal one this time.


As they bake, the crust puffs up slightly around the edges, creating little pockets of air. The center sinks down a little and creates the dense middle that's overflowing with chocolate. It's hard to even see any "blonde" between all the chocolate. I believe that's a good thing! If you can't resist waiting to eat these before they're totally cooled, I won't be blaming you.


Chewy Toffee Chocolate Blondies
Adapted from Baking: From my home to yours by Dorie Greenspan (not an affiliate link)
Makes 16

1 cup all-purpose flour
Scant 1/2 teaspoon baking powder
1/4 teaspoon baking soda
1/4 teaspoon sea salt
1 stick unsalted butter, at room temperature
1 cup sugar
1 teaspoon molasses
1 large egg
1 teaspoon vanilla
14 Andes toffee crunch thins, roughly chopped (or 1/2 cup other toffee chocolate candies)
4 ounces bittersweet chocolate, roughly chopped (or 3/4 cup chocolate chips)

Preheat oven to 325 degrees F.

Butter a 8x8-inch pan.

In a small bowl, whisk together the flour, baking powder, baking soda, and salt.

In a large mixer bowl with paddle attachment, beat butter on medium speed for 2 minutes or until light and fluffy. Add sugar and molasses. Continue to beat on medium for 3 more minutes.

Add egg and beat until combined. Stir in the vanilla.

Pour the dry ingredients into the wet ingredients and stir until just combined.

Using a wooden spoon (or other sturdy spoon), gently stir in the toffee and chocolate.

Spread evenly in buttered pan.

Bake for 35-40 minutes or until a knife inserted in the middle comes out clean and the top is a golden brown.

Allow to cool completely in pan before serving.

Store in a covered container on the counter for a few days or in the freezer for a few months.


Pinit

I'm linking up this recipe at Frugal by Choice, Cheap by Necessity. 

Wednesday, January 9, 2013

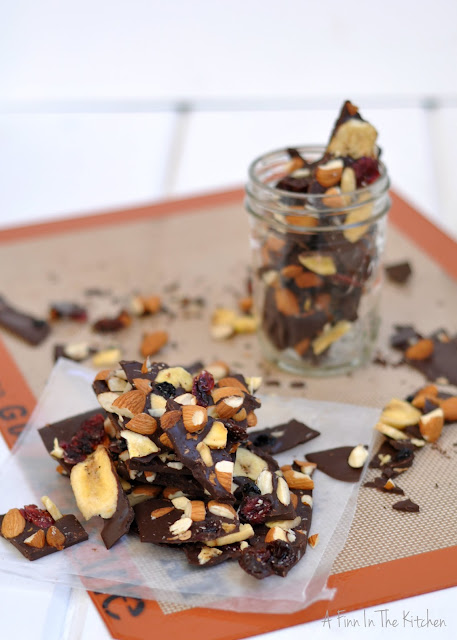
Bittersweet Gorp Bark


Generally, you usually see bark recipes during the holidays, but this is a less-sweet version that can be enjoyed at any time of year. It's super simple and only takes about 10 minutes to put together. Plus, it's all about gorp and we all know how much of a "crunchy" person I can be.


If you like salted chocolate, you'll love this because it combines all those flavors and is easy to change up. Don't like almonds? Try cashews or hazelnuts! Or even sunflower seeds!

If you've been around for even a few weeks, you know how much I love my dark chocolate. I don't like anything sickeningly sweet and I'd much rather taste the tang of fruit or saltiness of the almonds.

The amounts I used here will give you bark with a thin shard of chocolate, so if you prefer a thicker slab, just double the amount of chocolate and spread it a little thicker.


Without further ado...


Bittersweet Gorp Bark
Serves 4
10 minutes assembly time and 20 minutes to freeze

1 cup dark chocolate chips or 5 ounces bar chocolate, roughly chopped
Pinch of sea salt
1 cup trail mix (I used a combination of dried cranberries, banana chips, dried berries, and almonds)

Line a sheet pan with parchment paper.

Heat about an inch of water until simmering.

Place chocolate in a heat proof bowl and set over simmering water, stirring until fully melted and smooth.

Pour onto parchment paper and spread to 1/8- to 1/4-inch thickness.

Sprinkle with a pinch of sea salt and the trail mix.

Using your hands, press down to secure the mix is set into the chocolate.

Place in freezer for 20 minutes.

Roll up the parchment paper to crack the bark and store the pieces in a sealed bag in the refrigerator or freezer.


Pinit

I'm linking up this recipe at Sweet 2 Eat Baking, Or So She Says, Lemons for Lulu, Design, Dining, and Diapers, The Humble Brag, Taste and Tell, Buns In My Oven, & DJ's Sugar Shack.

Monday, January 7, 2013

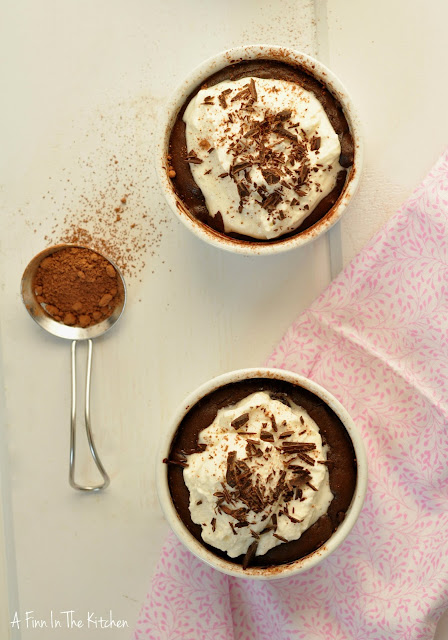
Mocha Lava Cakes Sweetened with Honey (Flourless)


If I could only have one dessert for the rest of my life, this would be it. And that's saying a lot! Although I really love cheesecake, these cakes are more of an everyday treat. Plus, you don't have to wait hours/days to eat them!


Valentine's Day is coming up fast and this is all you'll need to impress your sweetheart. It's such a basic one-bowl dessert that is guaranteed to start someones heart a fluttering. These are rich, without being overly sweet. I dream about these and it's how I say "I love you" in food to my husband.


 My sister is the one who originally re-worked a recipe that started out using 2 cups of powdered sugar! She's a genius like that. I took her creation and made it flourless for my dear husband who's abstaining from gluten this year. I'll consider it part of my Valentine's gift to him. Odds are, I'll actually make these again on Valentine's day because we adore them so much.


If you don't have ramekins, you can use a muffin pan. You'll probably end up with more than four servings and will have to shorten the baking time slightly.

I hope you love them as much as we do!


Flourless Mocha Lava Cakes (sweetened with honey)
Makes 4 servings

Coconut oil or butter to grease ramekins
Cocoa powder
8 ounces bittersweet chocolate, roughly chopped, plus a few shavings for serving
1 stick (1/2 cup) unsalted butter, cut into tablespoon-size pieces
1 tablespoon instant coffee granules
1 teaspoon vanilla extract, plus 1/4 teaspoon for whipping cream
2 tablespoons honey, plus 1 teaspoon for whipping cream
1/4 teaspoon sea salt
1/2 teaspoon baking soda
4 large eggs
1/2 cup heavy whipping cream, for serving

Grease four 6-ounce ramekins with coconut oil or butter and sprinkle in about 1 tablespoon of cocoa powder, shaking to coat the interior. Tap out the excess cocoa into the next ramekin and repeat until all are fully coated. Place ramekins on a baking sheet.

Preheat oven to 375 degrees F.

Put about an inch of water in a medium saucepan and bring to a simmer. Place chocolate and stick of butter into a mixing bowl that fits over the saucepan. Stir until contents are fully melted and smooth. Remove from heat and stir in coffee, vanilla, honey, salt, and baking soda with an electric mixer.

Add eggs, one at a time, stirring to combine thoroughly between each addition. Then increase speed to high and beat for 4 minutes. The batter will lighten noticeably in color and thicken in consistency.

Divide the batter evenly between the four prepared ramekins, smooth the surface with a spoon, and bake for 10-12 minutes. If you plan on leaving the cakes in the ramekins to serve (my preference), lean more toward 10 minutes. For less 'lava' and more cake, bake for 12 minutes.

While cakes are baking, whip the heavy cream on medium-high speed until it forms soft peaks. Add 1/4 teaspoon of vanilla extract and 1 teaspoon of honey. Whip for another 30 seconds or until fully combined.

Allow to cool for 5 minutes. Run a sharp knife around the edges and turn over onto a plate or keep in ramekins if you prefer. Top with a dollop of cream and a few chocolate shavings.

Serve warm.

If you want to save some for another time, keep the unbaked ramekin covered in the fridge with plastic wrap until ready to use. You may need to extend the baking time by a few minutes since the batter will be cold.


Pinit

I'm linking up this recipe at Sweet 2 Eat Baking, Back for Seconds, Lady Behind the Curtain, Crumbs and Chaos, Buns in My Oven, Frugal by Choice, Cheap by Necessity, Little House in the Suburbs, & Sundae Scoop Link Party.