Monday, April 29, 2013

Strawberry Ice Cream Cups


I can finally feel spring arriving! Just this morning I planted my very first vegetable garden. It's small but I'm ruthlessly optimistic...

Anxiously waiting for the farmer's markets to start popping up, young grass to sprout, and trees to start unleashing their leaves is maddening. Finding strawberries that aren't astronomically priced really helps move that feeling along. Not that chocolate isn't fantastic year-round, but berries must take priority when they're fresh and cheap. And what better way to enjoy them than in homemade ice cream?


Finding Jeni's Splendid Ice Creams at Home in the used bookstore was probably my find of the season. So far, I'd recommend it highly! The ice cream still comes out nice and creamy without using egg yolks and an overnight rest in the refrigerator. Anything that can be done to shorten the time from custard-to-cone is worth trying, especially when you don't have to sacrifice flavor.

I'd recommend serving these with a little extra berry puree, whipped cream, and fresh berries. But there's nothing boring about having them plain either.

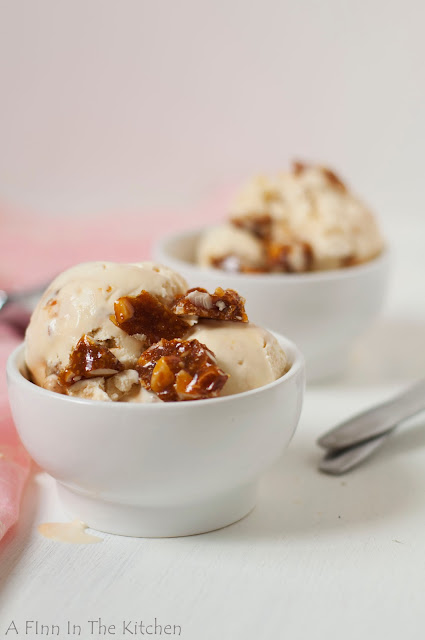
Don't let the fairly pale color of this ice cream fool you. The berries truly shine and the flavor is more intense than you'd expect.


Strawberry Ice Cream Cups
Yield: 12 servings
Adapted from Jeni's Splendid Ice Creams at Home

*Make sure if you have a ice cream maker that uses a frozen canister, it has been in the freezer for at least 24 hours.

Ice Cream
1 lb. strawberries, washed, hulled, and sliced in 1/2-inch slices
1/4 cup sugar
2 tablespoons lemon juice
1 1/2 cups whole milk
2 tablespoons cornstarch
2 ounces (4 tablespoons) cream cheese, softened
Pinch of sea salt
1 1/4 cups heavy whipping cream
2/3 cups sugar
2 tablespoons honey
1/4 cup buttermilk or 1/2 teaspoon lemon juice + 1/4 cup whole milk (if using lemon juice and milk, stir together at least 10 minutes before using)
Crust
13 Oreos
3 tablespoons unsalted butter, melted

Strawberries for serving, optional
Whipping cream for serving, optional


For the ice cream:
Preheat oven to 375 degrees F.

Stir the strawberries and 1/4 cup sugar in an 8 x 8-inch baking pan and bake for 8-10 minutes or until berries are soft and some juice has accumulated in the pan.

Allow to cool slightly and transfer to the bowl of a food processor with the lemon juice. Process until smooth. Reserve 1/2 cup of puree for the ice cream and refrigerate the remainder in an airtight container for serving and other uses. Try using it to flavor plain yogurt or pour over pancakes.

In a small bowl, whisk together 2 tablespoons of milk and the cornstarch until no lumps remain.

In a medium bowl, whisk together the cream cheese and sea salt.

In a large saucepan over medium high heat, bring the remaining milk and whipping cream, sugar, and honey to a rolling boil while stirring frequently. Once it boils, continue stirring for another 4 minutes and remove from the heat.

Gradually add the cornstarch while whisking constantly. Return to the heat and bring back to a boil for about 1 minute while stirring constantly.

Slowly pour the hot milk into the cream cheese bowl and whisk until smooth. Whisk in the 1/2 cup of puree and buttermilk.

Transfer to the refrigerator and allow to cool until chilled through, stirring occasionally to speed up the process.

For the crust:
While the custard is cooling, you can start the crusts.


Preheat oven to 325 degrees F.

Pulse the Oreos in a food processor until it forms small crumbs. Add in the melted butter and pulse until evenly incorporated and the crumbs begin to stick together in larger chunks. They should be glossy and sticky.

Evenly divide the crumbs between 12-cup muffin pan. Press down with your fingertips, forming a slight depression in the middle.

Bake for 5-7 minutes then transfer to the freezer.

To assemble:
Process your ice cream according to your machine directions.

Top each crust with ice cream until the well is full. Smooth the surface with the back of a spoon. Work quickly and place the pan back in the freezer as soon as possible.

Freeze for at least 2 hours before serving.

To remove from the pan, run hot water over a washcloth and wring out. Rub the bottom and sides of the muffin tin to release the ice cream. You may have to run a knife around the edges as well and work it out with the tip of your knife.

Serve topped with fresh berries, whipping cream whipped to soft peaks, or additional strawberry puree.


Pinit

Wednesday, April 17, 2013

Cashew Chicken Stir Fry (Guest Post on Savory Lotus)


Today I have the honor of doing a guest post for Katja over at Savory Lotus. I made her and her followers some grain-free cashew chicken stir fry. Katja has all kinds of paleo, grain-free, and healthy recipes, so I know you'll find something delicious while digging around in her recipe archives! You can find this recipe here.

Caramelized Almond Nougat Mousse Ice Cream


Roxana, from Roxana's Home Baking, got a group of food bloggers together to celebrate a virtual housewarming for our fellow blogger, Ashton. She's the powerhouse behind Something Swanky and because distance prevents us from giving her an actual housewarming party, we got together and made food that we would have brought to celebrate her new house. The links to the other attendees are below, so check out what everyone else brought!

Since even the thought of moving (I've done it a lot) makes me sweat, I made ice cream (I've done that a lot too). There's nothing better than propping up your tired sweaty dogs and digging into a big bowl of ice cream, is there?

Here in Wisconsin, we have frozen custard on almost every corner. It's my downfall! My nemesis! But mostly, my bosom buddy. I'm not as susceptible in the winter because I hate being cold, but summer can be dangerous. There are two places that I frequent on a *regular* basis and between them, they have 3 unique flavors every day! Odds are, one of them will lure me out of the house.

This ice cream base is sweetened with honey and open to an infinite amount of mix-ins and flavors. I can guarantee that I'll be using this over and over again this summer.

Many homemade ice cream recipes use alcohol to keep it from turning to a brick in the freezer, but this has stayed scoopably soft for days and is alcohol-free! The small chunks of caramelized almonds are a cross between peanut brittle and butter brickle.

This recipe requires at least an overnight rest in the refrigerator so start the day before. Believe me, it's worth the wait.


Caramelized Almond Nougat Mousse Ice Cream
Yield: 2 quarts


Nougat (adapted from Small Plates and Sweet Treats)
3/4 cup sugar
1/3 cup raw almonds, roughly chopped
1 cup heavy whipping cream
1 teaspoon vanilla extract
3 egg whites
1/4 cup honey
Ice Cream (adapted from Tartelette)
4 egg yolks
1/3 cup honey
Pinch of sea salt
1 1/2 cups whole milk
1 1/2 cups heavy whipping cream

For the nougat:
Line a baking sheet with a baking mat or piece of lightly greased parchment paper.

In a medium saucepan over medium to medium-high heat, pour 1/4 cup of sugar. Do not stir. Allow it to melt before adding the next 1/4 cup of sugar. Swirl the pan if necessary to prevent burning before all the sugar has melted. Finally, add the last 1/4 cup of sugar, continuing to periodically swirl to prevent uneven cooking. When all the sugar has melted and is a deep amber color, stir in the chopped almonds and pour on the lined pan to cool. Chop it into small pieces.

Whip the heavy whipping cream and the vanilla extract with a mixer and whisk until it forms soft peaks. Transfer to the refrigerator.

In another bowl, whip the egg whites until soft peaks form. Heat the 1/4 cup of honey in a small saucepan over medium heat until it thins. Slowly add the honey to the whites while continuing to stir. Once all the honey is incorporated, increase speed to high. The meringue is done when the bowl is no longer warm and stiff peaks have formed.

Fold the meringue and nut pieces into the whipping cream. Place in an airtight container and freeze.

For the ice cream:
Beat the yolks, honey, and salt for a few minutes in a large bowl until light in color.

Heat the milk and whipping cream over medium heat in a large saucepan until one or two bubbles rise to the surface and pop.

Add the hot milk to the yolks, then return to the saucepan and the heat. Continue cooking until the mixture thickens enough to coat the back of a wooden spoon.

Store in an airtight container in the refrigerator overnight.

Make your ice cream according to the manufacturer's directions for your machine.

To assemble:
While the ice cream is in the machine, chop up the frozen mousse with a spoon.


Once the ice cream is finished, stir the mousse and ice cream together. Place in an airtight container in the freezer for a few hours to firm up.


Pinit

Julianne at Beyond Frosting - Pound cake with Champagne Glaze
Kate at Food Babbles - Raspberry Lemon Coffee Cake
Anna at Crunchy Creamy Sweet - Glazed Vanilla Donut Muffins
Joanne at Fifteen Spatulas - Cinnamon Crumb Coffee Cake
Ashley at Kitchen Meets Girl - Blueberry Muffins
Amber at Bluebonnets and Brownies - Lemon Drop Cookies
Dorothy at Crazy for Crust - Reese's Fudge
Joan at Chocolate Chocolate and more - Broccoli and Cheddar Cheese Quiche
Roxana at Roxana's Home Baking - Banana Sheet Cake
Julie at White Lights on Wednesday - Mocha Cupcake Milkshake
Tanya at Lemons for Lulu - Lemon Muffins
Natasha at The Cake Merchant - Nutella Layer Cake 
Hayley at The Domestic Rebel - Banana Split Poke Cake
Jocelyn at Inside Brucrew Life - Butterscoth Banana Muffins

Note: This post does NOT contain affiliate links.

I also shared this recipe at The Hopeless Housewife.

Friday, April 12, 2013

Peanut Butter Cheesecake Layer Brownies


I refuse to apologize for these ones. Being slightly senile, I can't say with 100% certainty that these are my favorite brownies I've ever eaten, but they're the best I can remember!

Per my standard, these aren't sweet, but are instead intensely rich and satisfying. With only a small amount of flour and a pared-down amount of sugar, I'd almost call these healthy, but I probably wouldn't be fooling anybody.

I'm keeping this one short and (not too) sweet. Haha.

I hope these tickle your gullet as much as they did mine.

I tried to utilize the same bowls and pans for multiple steps, so you shouldn't have a totally overwhelming pile of dishes at the end!


Peanut Butter Cheesecake Layer Brownies
Brownie recipe adapted from Baking at Home 
Yield: 16 brownies

Brownie
3/4 cup (1 1/2 sticks) unsalted butter, cut into pieces
4 ounces bittersweet chocolate, chopped
2 large eggs
3/4 cups sugar
1 teaspoon vanilla extract
1/4 teaspoon sea salt
1/4 cup all-purpose flour
Peanut Butter Cheesecake
1 cup heavy whipping cream
1 teaspoon sugar
8 ounces cream cheese, at room temperature
1/2 cup creamy peanut butter
Ganache
3 ounces bittersweet chocolate, finely chopped
3/4 cup heavy whipping cream

For the brownie:
Preheat the oven to 350 F.

Butter the bottom and sides of an 8x8-inch pan or line with parchment paper, leaving some overhang on two sides if you'll want to remove the brownies from the pan in one piece.

Melt butter and chocolate in a small saucepan over medium-low heat. Stir with a wooden spoon until smooth and glossy.

In a large metal bowl or stand mixer bowl fitted with a whisk attachement, whip eggs, sugar, vanilla, and salt on high speed (8 on a KitchenAid) for 4 minutes.

Pour about 1/4 of the egg mixture into the melted chocolate and stir. Add all of the chocolate into the stand mixer bowl and stir until fully incorporated. Gently stir in the flour, just until combined.

Pour the batter into the buttered pan and bake for 30-40 minutes and the center looks only slightly moist.

Set the pan on a drying rack and cool to room temperature before adding the peanut butter layer.

For the peanut butter cheesecake:
In the bowl of a stand mixer with the whisk attachment, whip the heavy whipping cream to light peaks then slowly whisk in the sugar for another 30 seconds. Transfer to another bowl.

Beat the cream cheese and peanut butter in the same stand mixer bowl, this time with the paddle attachment until light and fluffy. (No, you shouldn't have to clean the bowl.)

Gently fold the whipped cream into the peanut butter until no streaks remain.

Spread in a thick layer over the cooled brownies using a spoon or offset spatula.

For the ganache:
Place the finely chopped chocolate in the stand mixer bowl.

Using the same saucepan from the brownie layer (just rinse the chocolate from the pan), heat the heavy whipping cream over medium-low heat until it steams.  

Pour it over the chopped chocolate and allow it to sit for 3 minutes. Whisk until smooth and chocolate is completely melted.

Pour over the peanut butter layer and place in the refrigerator to cool for at least 1 hour.

To serve:
Either cut while the brownies are still in the pan, or use your parchment paper overhang to remove from the pan to slice.

Keep leftovers in an airtight container in the refrigerator. 


Pinit

Monday, April 8, 2013

Chocolate Mousse with Ganache


Let's get one thing straight. I'm not afraid of fat. There. I said it. Well, to clarify, I'm not afraid of unprocessed fats. That's why my recipes usually have reduced sugar and *increased fat. Maybe unrestrained would be a better way to phrase that. I never use 'low-fat' or 'reduced-fat' anything. Except the one time I accidentally bought fat-free cheese in college. Shudder. This recipe fully conforms to my desires. With a minimal amount of ingredients, and chocolate and whipping cream being the most 'exotic' ones, you might be able to make this without a trip to the store.


The richness of the ganache would be overwhelming if it wasn't balanced by the delicate mousse. The more you can restrain yourself while folding the egg whites into the chocolate, the bigger the reward. Aim for nearly weightless! Hold yourself back. If you've got some pent up aggression, unleash it while bringing your egg whites to peaks, not with the final folding. You've been warned.

As you plunge your spoon to the bottom of your mug, you'll hit alternating layers of resistance and fluff. Do everyone a favor and leave the mousse as the crowning layer, so the people eating this will be surprised.


Chocolate Mousse with Ganache
Adapted from Around My French Table
Yield: 4 servings

Mousse
3 1/2 ounces bittersweet chocolate, roughly chopped
3 tablespoons heavy whipping cream
3 large eggs, whites and yolks separated, and at room temperature
1 teaspoon vanilla extract
Pinch of salt
1 teaspoon sugar
Ganache
3 ounces bittersweet chocolate, finely chopped
1/2 cup heavy whipping cream

For the mousse:
Pour about an inch of water into a small saucepan and bring to a simmer over medium heat. Place 3 1/2 ounces chocolate in a heat proof bowl and set over simmering water, stirring until fully melted. Remove from heat.

Whisk in 3 tablespoons whipping cream, followed by the egg yolks, one by one, and the vanilla. Don't worry if the mixture thickens alarmingly. You'll thin it out soon.

In a separate bowl, whisk the room temperature egg whites by hand or with a stand mixer until soft peaks form. While continuing to whisk, gradually add in the sugar. Keep whisking until the egg whites form medium-firm peaks.

Scoop out about 1/4 of the whites and whisk into the melted chocolate to thin.

Add the rest of the egg whites to the chocolate and gently stir in with a whisk or rubber spatula, being careful not to whip out all the air bubbles.

For the ganache:
Place the remaining 3 ounces of chocolate in a heat-proof bowl.

In a small saucepan, heat the heavy whipping cream over medium-low heat until it steams.

Pour over the chocolate and allow to sit for 3 minutes. Stir until smooth and glossy.

To assemble:
Scoop a few tablespoons of mousse into the bottom of four glasses or cups and top with a thin layer of ganache. Continue to alternate layers until all the ingredients are used. Think about using tall thin glasses to impress and tiny mugs for a more rustic feel.

If the ganache becomes too thick to pour, quickly reheat it over simmering water to thin.

Refrigerate for at least 2 hours to allow the ganache to firm up.


Pinit

I've shared this recipe at Rediscover Mom.